

Disheartened by grainy photos that fail to capture the magic of the moment? You’re not alone. Image noise, those pesky color specks that wreak havoc on your photo’s clarity, can steal the vibrancy from your most cherished memories. But what if there was a way to restore your photos to their former glory, effortlessly? Enter the transformative power of Artificial Intelligence (AI). This article unveils the secrets to remove noise from image, your one-stop solution for achieving stunningly clear and professional-looking images.
Understanding Image Noise and its Impact
Before diving into noise reduction techniques, let’s explore what image noise is and how it affects your photos.
- What is image noise? Image noise refers to random variations in brightness or color that appear as speckles or grain in a digital image. It can significantly impact the visual quality, making photos appear blurry or lacking detail.
- Causes of image noise: There are two main types of image noise: luminance noise, which affects the brightness of pixels, and color noise, which creates unwanted color variations. Both can be caused by factors like low-light conditions, high ISO settings on your camera, or even sensor issues.
Removing Noise with Precision in Photoshop
For those comfortable with image editing software, Adobe Photoshop offers a comprehensive toolkit for noise reduction.
Here’s a breakdown of the steps involved in removing noise from images using Photoshop:
Step 1: Setting Up Your Workspace
- Open your noisy image in Photoshop.
- Duplicate the background layer to create a non-destructive working copy. This allows you to go back to the original if needed.

Step 2: Using the Noise Reduction Filter
- Navigate to Filter > Noise > Reduce Noise.
- The Noise Reduction filter offers sliders for adjusting both luminance noise and color noise. Experiment with these sliders to find the right balance between noise reduction and detail preservation.
- The “Sharpen” option can help retain details after noise reduction. Use it cautiously to avoid creating halos around edges.

Step 3: Fine-tuning with Adjustment Layers
- Depending on the image, you might need additional adjustments. Consider using tools like:
- Selective Noise Reduction: Target specific areas of the image with noise reduction using layer masks.
- Levels or Curves: Fine-tune the overall contrast and tonal balance of the image after noise reduction.
Tips for Effective Noise Reduction in Photoshop:
- Understanding noise types: Distinguish between luminance and color noise to apply targeted reduction with the appropriate sliders.
- Preserving details: Don’t overdo the noise reduction. Use a light touch to avoid making the image appear soft or waxy.
While Photoshop empowers you with exceptional control, it requires photo editing skills and can be time-consuming for extensive noise reduction. This is where AI-based tools like Face26 come in handy.
Effortlessely Remove Noise from Image Noise with Face26
Face26 offers a user-friendly AI solution specifically designed to remove noise from images.
- Quick and effective: Face26 utilizes advanced algorithms to automatically remove noise in seconds, saving you time compared to manual techniques in Photoshop.
Here’s a simplified guide on how to use the Face26 Noise Reduction Tool:

Step 1: Upload the noisy image
- Visit the Face26 website or download the Face26 mobile app from the App Store or Google Play.
- Click on “AI Photo Enhancer” and upload your image using the drag-and-drop function or the “Upload Image” button.

Step 2: Automatic noise reduction process
- Face26’s AI will analyze your image and automatically remove noise. The processing time may vary depending on the image size,but it’s typically very fast.

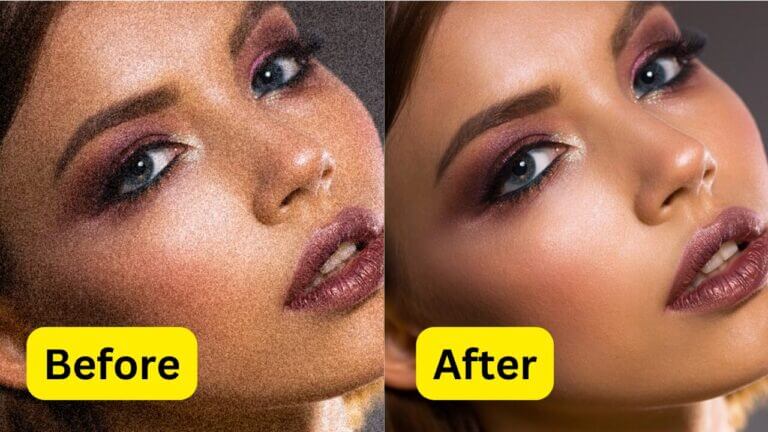
Step 3: Reviewing and adjusting the results
- Face26 provides a convenient before-and-after view to compare the results.
- You can also make minor adjustments using basic sliders for strength and detail enhancement (optional).
Advantages of Using Face26 for Noise Reduction:
- Speed and simplicity:No need for complex editing techniques. Remove noise from photos in seconds with just a few clicks.
- High-quality results: Face26’s AI is trained on a massive dataset of images, allowing it to effectively remove noise while preserving the overall quality and details of your photo.
- Automatic noise detection: Face26’s AI can intelligently identify noise patterns in your photos. This eliminates the need for manual adjustments, making it easier and faster to target the specific areas needing correction.
- Preserves image details: While removing noise, Face26 prioritizes maintaining the sharpness and clarity of fine details in your photos. This ensures the final image isn’t left looking blurry or overly smoothed out after noise reduction.
Choosing the Right Tool: Face26 vs. Photoshop for Noise Reduction
The best method for removing noise from images depends on your specific needs and the severity of the noise. Here’s a head-to-head comparison of Face26 and Photoshop:

| Feature | Photoshop | Face26 AI Noise Reduction |
| Effort Required | High (requires photo editing skills) | Low (user-friendly, automatic removal) |
| Time Efficiency | Time-consuming, manual editing | Fast, automatic processing in seconds |
| Output Quality | Potentially higher quality with precise edits | High-quality results, good for most noise levels |
| Price | Paid software (subscription or one-time purchase) | Free tier with limitations, premium plans available |
Advanced Noise Reduction Techniques in Photoshop
For photographers comfortable with Photoshop, here are some advanced techniques for tackling noise:
- Layer masks for localized noise reduction: Create a layer mask to isolate specific areas of the image with higher noise levels. Apply noise reduction selectively to those areas while preserving details in the rest of the image.
- Combining noise reduction with sharpening: Noise reduction can sometimes soften image details. Carefully apply sharpening after noise reduction to restore clarity and definition, but be mindful of creating halos around edges.
User Engagement and Practical Advice
Common Challenges in Noise Reduction:
- Low-light photographs: Images taken in low-light conditions often have inherent noise due to the limitations of camera sensors. Both Face26 and Photoshop can help, but achieving a perfect balance between noise reduction and detail preservation might be more challenging.
- High ISO images: Using a high ISO setting on your camera increases image noise. While noise reduction tools can help, there’s a limit to how much noise can be effectively removed without sacrificing image quality. It’s always best to try to capture photos with the lowest ISO possible to minimize noise from the start.
In conclusion, noisy photos can be a thing of the past! This article explored various methods to Remove Noise from Image, from manual techniques in Photoshop to the effortless power of AI-based solutions like Face26. While Photoshop offers granular control for experienced editors, Face26 provides a user-friendly, one-click approach that delivers impressive results in seconds. For most noise reduction needs, Face26 stands out as the faster, simpler, and more accessible option. Visit the Face26 Website or download the app to experience the magic of AI-powered noise reduction and bring your photos back to life!
Frequently Asked Questions
Q: Can the Face26 tool remove noise from any type of image?
Face26 tackles most noise levels effectively. For extreme cases in very low-light photos, while some additional recovery might be possible with Photoshop’s precise controls, Face26 often delivers fantastic results with its one-click AI processing.
Q: Is it possible to automatically adjust noise levels using Face26?
Absolutely! Face26’s AI analyzes your image and automatically removes noise..
Q: What file formats are supported by the Face26 noise reduction tool?
Face26 currently supports popular image formats like JPEG,PNG,and BMP.
Q: How can I prevent noise when taking photos, especially in low light conditions?
Use a tripod to allow for slower shutter speeds, capturing more light and reducing the need for high ISO. If possible, increase the aperture to let in more light.
Q: Are there any types of images where noise cannot be effectively reduced?
In very extreme cases, especially with heavily compressed images or those with overwhelming noise levels, achieving perfect noise reduction might not be possible without sacrificing image quality.


