

High-resolution images are essential across various fields, from professional photography to digital art. Whether you’re a photographer looking to produce sharp, detailed prints, or a digital artist aiming for flawless visuals, learning how to make images high resolution in Photoshop can significantly enhance the quality of your work.
This guide will walk you through the steps to increase image resolution and ensure the best possible results using Adobe Photoshop. Additionally, we’ll explore an alternative too, that can simplify the process even further.

Understanding Image Resolution
Before diving into the technical steps, it’s important to understand what image resolution means. Image resolution refers to the amount of detail an image holds and is typically measured in pixels per inch (PPI). The higher the PPI, the more detail the image contains, leading to a sharper and clearer visual.
Pixels and Resolution: The Basics
Pixels are the small colored squares that form an image on digital displays. When discussing resolution, we’re referring to the number of pixels contained within a certain space, measured in pixels per inch (PPI). The higher the PPI, the more detail the image will hold, resulting in a sharper appearance.
For instance, an image with a resolution of 72 PPI may look decent on a computer screen but will appear pixelated if printed. On the other hand, an image with 300 PPI will look sharp and clear both on screens and in print, which is why resolution plays a crucial role in image clarity and print quality..
Impact on Clarity and Print Quality
Higher resolution images not only look sharper on screens but also translate better when printed. Low-resolution images may appear pixelated and lack the crispness needed for professional outputs. This is why learning how to make images high resolution in Photoshop is vital for anyone involved in visual arts or media.
Preparation Before Enhancing Resolution
Before you start enhancing the resolution of an image in Photoshop, it’s vital to prepare your image properly. Proper preparation ensures that the final result is as high quality as possible.
Steps to Prepare Your Image
- Start with the Best Quality Image Possible: The quality of the original image will greatly affect the final result. Always aim to work with the highest resolution image available. If you start with a low-resolution image, improving the quality of the image in Photoshop will be more challenging, and the results may be less satisfactory.
- Assess the Image: Look for any visible issues like noise, blurriness, or color imbalances that might affect the upscaling process. Fixing these issues beforehand will result in a cleaner, higher-quality final image.
- Convert the Image to the Appropriate Color Mode: If you’re planning to print the image, ensure it’s in CMYK mode; for digital use, RGB is preferred.
Detailed Steps to Increase Image Resolution Using Photoshop
Photoshop offers several tools and methods to increase image resolution while maintaining quality. Here’s a step-by-step guide to doing so.
Adjusting Image Size and Resolution Settings
- Open Your Image in Photoshop: Start by opening the image you want to enhance.

- Access the Image Size Menu: Navigate to `Image` > `Image Size`. This menu allows you to see and adjust the current dimensions and resolution of your image.
- Enable Resample: Ensure the ‘Resample’ box is checked. This option lets Photoshop add or remove pixels, which is essential for changing the resolution.

- Adjust the Resolution: Increase the resolution value in the box labeled ‘Resolution’. A standard for print is 300 PPI, but you can go higher depending on your needs. This step is key in learning how to improve the resolution of an image in Photoshop.
- Choose the Right Resample Method:

- Bicubic Smoother: Ideal for enlarging images as it smooths out artifacts.
- Preserve Details 2.0: A more recent method that uses AI to maintain image details while enlarging. This is often the best choice for photos as it reduces the risk of losing detail.
- Click OK: Once you’ve adjusted the settings, click OK to apply the changes.
Advanced Techniques for Image Quality Enhancement
Photoshop’s latest features incorporate AI and machine learning, providing more advanced tools for enhancing image quality.
Using Photoshop’s Super Resolution Feature

1.Access Super Resolution: Right-click on your image and select `Enhance`. In the dialog box, check the ‘Super Resolution’ option. This feature intelligently doubles the resolution, adding four times the pixels without sacrificing quality. If you’re wondering how to get higher resolution in Photoshop, this is one of the most effective methods.
2.Apply Noise Reduction: After enhancing the resolution, use the noise reduction filter to minimize any graininess that may have appeared. Navigate to `Filter` > `Noise` > `Reduce Noise` and adjust the sliders as necessary.
3.Fine-Tune the Image: After applying Super Resolution, you might want to adjust other settings like sharpness or texture to get the image just right.
Sharpening Techniques Post-Resampling
After resampling and enhancing your image, it might need a little more sharpening to really bring out the details.
Using Unsharp Mask

1. Access Unsharp Mask: Go to `Filter` > `Sharpen` > `Unsharp Mask`. This tool sharpens the image by increasing the contrast along the edges of the details.
2. Adjust the Settings:
- Amount: Controls how much to increase the contrast of pixels.
- Radius: Determines the number of pixels surrounding the edges that affect sharpening.
- Threshold: Specifies how different the sharpened pixels must be from the surrounding area before they are considered edge pixels and sharpened.
- Preview and Apply: Use the preview window to see the effect and adjust the sliders until you are satisfied. Then click OK to apply the changes.
High Pass Filter
Another method to sharpen images is using the High Pass filter.

1. Duplicate the Layer: First, duplicate your image layer by pressing `Ctrl + J` (Windows) or `Command + J` (Mac).
2. Apply High Pass Filter: Go to `Filter` > `Other` > `High Pass`. Set the radius to a low value to start, typically between 1.0 and 3.0 pixels.
3. Set Blending Mode: Change the blending mode of the High Pass layer to `Overlay`. This will blend the edges, enhancing sharpness without overdoing it.
Practical Tips and Common Pitfalls
While Photoshop provides powerful tools for increasing image resolution, there are some practical tips and common pitfalls to keep in mind.
Tips for Best Results
- Work in 16-bit mode: This provides a higher color range and better quality during adjustments.
- View at 100%: Always check your image at 100% zoom to see the true effect of your adjustments.
- Use Adjustment Layers: These allow you to make non-destructive changes to your image.
Common Mistakes to Avoid
- Over-Sharpening: This can introduce halos and unnatural edges, detracting from the image quality. To improve image quality in Photoshop, sharpening should be done with caution.
- Ignoring Aspect Ratio: When resizing, maintain the aspect ratio to avoid distorting the image.
- Relying Solely on Software: Remember that increasing resolution can’t create detail that wasn’t there to begin with. Always start with the best quality image possible.
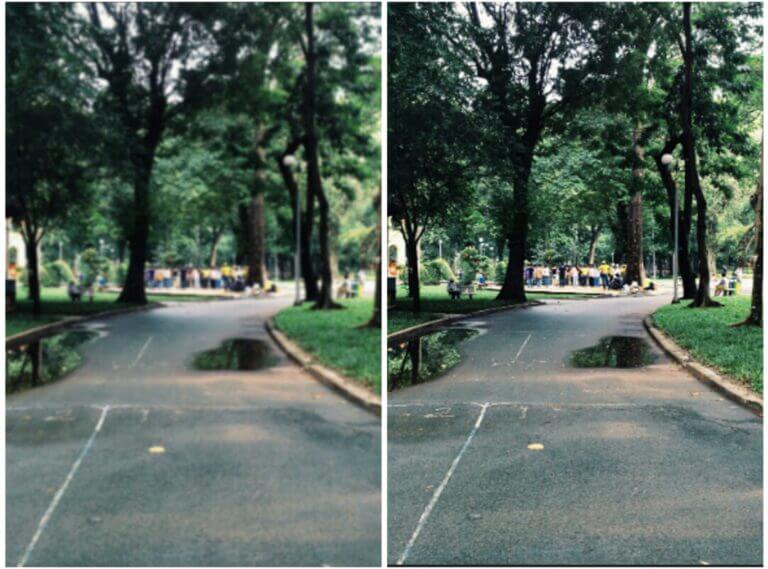
Face26: A Simple Alternative for Image Upscaling
While Photoshop is an incredibly powerful tool for increasing image resolution, it can be complex and time-consuming, especially for those new to the software. For those looking for a simpler, yet effective alternative, the Face26 AI Image Upscaler offers a user-friendly solution.
Face26 offers a user-friendly, AI-powered solution for upscaling images, making it a simple alternative to more complex software like Photoshop. The process is designed to be straightforward, catering to users who may not have extensive technical skills but still require high-quality results.
Step-by-Step Process:

1.Upload the Image: Begin by navigating to the Face26 website and accessing the AI Image Upscaler tool. Here, you can easily upload the image you want to upscale. The platform supports various image formats, ensuring compatibility with most common file types.
3.AI-Powered Upscaling: Face26’s AI algorithms get to work. The tool uses advanced machine learning techniques to analyze the image and intelligently add pixels, increasing the resolution without losing quality. Unlike traditional upscaling methods that often result in pixelation or loss of detail, Face26’s AI reconstructs the image, enhancing details, sharpness, and texture.
4. Preview and Download: Once the upscaling process is complete, you can preview the enhanced image directly on the platform. If you’re satisfied with the result, simply download the high-resolution image to your device. The entire process typically takes just a few moments, depending on the image size and desired resolution.
Why Choose Face26?
Face26 uses advanced AI algorithms to upscale images effortlessly, making it a great option for those who need quick and effective results without diving into the technicalities of Photoshop. Simply upload your image, choose the desired output resolution, and let the AI do the rest. The results are often comparable to those achieved through manual Photoshop techniques but with significantly less effort and time.
Mastering the art of increasing image resolution in Photoshop opens up a world of possibilities for producing high-quality visuals. By understanding the tools and techniques available, you can ensure that your images always look their best, whether for print or digital use. However, if you’re looking for an easier and faster solution, Face26 offers a compelling alternative with its AI-powered image upscaling tool. Whether you’re aiming to improve photo quality in Photoshop or seeking the highest resolution in Photoshop, this guide provides the knowledge you need to get started.
FAQs
What is image resolution, and why is it important?
Image resolution refers to the amount of detail an image holds, typically measured in pixels per inch (PPI). Higher resolution means more pixels per inch, resulting in a sharper, clearer image. High-resolution images are crucial for professional outputs like printing and detailed digital work because they ensure the image remains sharp and clear, avoiding pixelation and blurriness.
How can I increase the resolution of an image in Photoshop without losing quality?
To increase the resolution in Photoshop without losing quality, you can use the ‘Image Size’ menu. Ensure the ‘Resample’ option is checked, then adjust the resolution to your desired value. Using advanced resampling methods like ‘Preserve Details 2.0’ helps maintain image quality by intelligently adding pixels. Additionally, Photoshop’s ‘Super Resolution’ feature, which uses AI, can also enhance image resolution significantly.
What are some common mistakes to avoid when enhancing image resolution in Photoshop?
Common mistakes include over-sharpening the image, which can introduce unnatural halos and edges, and ignoring the aspect ratio, which can distort the image. Another mistake is relying solely on software to create detail that wasn’t originally in the image—starting with the best quality image possible is crucial for achieving good results.
How does Face26 compare to Photoshop for increasing image resolution?
Face26 is an AI-powered tool that provides a simpler alternative to Photoshop for increasing image resolution. Unlike Photoshop, which requires technical knowledge and manual adjustments, Face26 automates the upscaling process, making it ideal for users who need quick and effective results without the steep learning curve. The AI in Face26 intelligently adds pixels and enhances details, offering high-quality outputs similar to those achieved through manual techniques in Photoshop.
Can I use Photoshop’s Super Resolution feature on any image?
Yes, Photoshop’s Super Resolution feature can be used on any image. It’s particularly effective for images that need to be enlarged significantly. The feature uses AI to intelligently increase the resolution, making it ideal for high-quality prints or large digital displays. However, the quality of the final image will still depend on the quality of the original file, so it’s best to start with the highest resolution image possible.


